How to Install an LED Display Screen Like a Pro!

Have you ever wondered how those giant LED display screens at shopping malls, conference halls, or stadiums are installed? They don’t just appear magically! They are assembled piece by piece, like LEGO, using special LED modules, power supplies, control cards, and steel frames.
In this post, we’ll walk you through the entire process—from start to finish—with detailed steps, images, and pro tips to make sure you understand how an LED display screen is built.
Let’s get started!
Step 1: Understanding LED Display Components
Before installing an LED screen, you need to know what it’s made of. Here are the key components:
- LED Modules – Small panels that light up and form the screen (like pixels in a TV).
- Power Supplies – Convert electricity to power the LED modules.
- Control Cards – The “brain” that processes and sends video signals to the LED screen.
- Data & Power Cables – Wires that connect everything together.
- Steel Frame – The structure that holds everything in place.
- Border/Edge Trim – Used for aesthetic finishing touches.
Step 2: Calculating Screen Size & Planning the Layout
Let’s say you want to install a P5 LED screen (which means each pixel is 5mm apart).
📏 Our Example Screen Setup:
- Module Size: Each LED module is 320mm × 160mm.
- Modules Required: 15 modules in width, 12 modules in height.
- Final Screen Size:
- Width = 320mm × 15 = 4800mm (4.8 meters)
- Height = 160mm × 12 = 1920mm (1.92 meters)
✨ Pro Tip: Always leave a small gap (about 10mm) around the edges for adjustments.
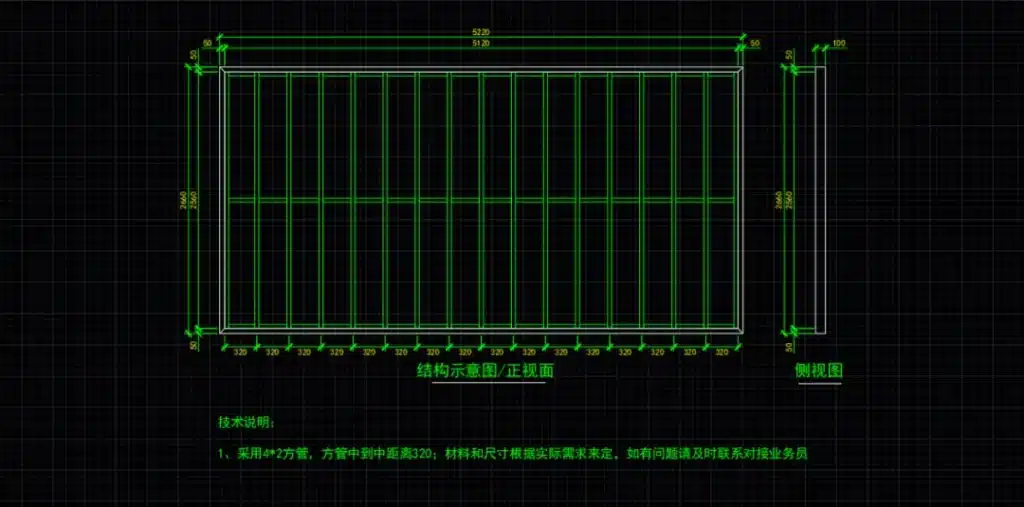
Step 3: Building the Steel Frame
The steel frame is the backbone of your LED screen. It needs to be strong and precise so that all modules fit perfectly.
🔨 How to Build the Frame:
- Buy Steel Bars – Use 4×4cm and 2×2cm square steel tubes.
- Cut & Weld – Weld them into a grid (like a window frame) to support the LED modules.
- Attach Back Supports – These help keep the structure firm on the wall.
- Fix to the Wall – Secure it using strong brackets or bolts.
✨ Pro Tip: Use a steel angle ruler to ensure all corners are at 90-degree angles for a perfect fit.
🔧 What It Looks Like:
📸 [Image of Steel Frame Welding]
Step 4: Installing Power Supplies & Control Cards
Once the frame is up, it’s time to install the electronic components.
⚡ Power Supply Setup:
- Each power supply can handle 4 LED modules.
- Connect 5V outputs carefully (wrong connections = burnt circuits!).
- 220V power cables should be properly insulated to avoid short circuits.
💾 Installing the Control Cards:
- Each control card handles multiple LED modules (usually 36 modules per card).
- Use network cables (RJ45) to link control cards together.
- The first control card connects to the computer via an Ethernet cable.
✨ Pro Tip: Label each wire to make troubleshooting easier!
📸 [Image of Power Supply Installation]
Step 5: Installing the LED Modules
Now comes the exciting part—attaching the LED modules to form the display!
🔹 How to Install LED Modules:
- Start from the bottom and work your way upwards.
- Attach each module to the steel frame using screws & connectors.
- Align modules carefully to avoid visible gaps between them.
- Connect power & data cables (short cables for module-to-module, long cables for control cards).
✨ Pro Tip: Small alignment errors = Big display problems! Take your time and ensure modules are perfectly aligned.
📸 [Image of LED Modules Being Installed]
Step 6: Connecting & Testing the Screen
Before you light up the LED screen, double-check all connections:
✅ Power Check: Are all power supplies working?
✅ Data Check: Are control cards properly connected?
✅ Alignment Check: Are all modules flush with each other?
Once confirmed, turn on the screen and run a test pattern:
- The screen should show solid colors (Red, Green, Blue) one by one.
- If any LEDs are not working, check the connections and power supply.
📸 [Image of Testing LED Modules]
Step 7: Final Adjustments & Edge Finishing
Once the screen is working perfectly, you can add edge finishing touches:
🛠 Final Steps:
- Install stainless steel borders for a polished look.
- Fine-tune module positions for seamless display.
- Configure brightness & color settings using the software.
📸 [Image of Completed LED Screen]
The Final Moment – LED Screen is Ready! 🎉
Congratulations! You’ve successfully installed an LED display screen. Now it’s time to showcase amazing visuals!
🔹 This process can be used for:
✅ Shopping Mall Displays
✅ Conference Room Screens
✅ Outdoor Advertising Boards
✅ Event & Concert LED Walls
FAQs: Common LED Display Installation Questions
💡 1. How long does it take to install an LED screen?
🔹 Small screens (2-3 meters) take 1-2 days. Large screens (5+ meters) can take 3-5 days.
💡 2. Can LED screens be installed outdoors?
🔹 Yes, but outdoor screens need weatherproof protection & higher brightness.
💡 3. What tools are needed for LED installation?
🔹 Drill machine, screwdriver set, welding tools, measuring tape, wire cutters.
💡 4. How much power does an LED screen consume?
🔹 A 5m x 3m LED screen consumes about 5-7kW depending on brightness.
💡 5. What is the lifespan of an LED screen?
🔹 A good LED display can last 80,000-100,000 hours with proper maintenance.
Conclusion: Now You Know How LED Screens Are Installed!
Installing an LED screen isn’t as complicated as it looks—but it requires precision, planning, and patience.
Next time you see a giant LED billboard or a conference room screen, you’ll know exactly how it was put together!
🔥 Did you find this guide helpful? Let us know in the comments! And if you’re planning an LED installation, feel free to ask questions. 🚀